Patterning
Methods for pattern development in Mokume Gane
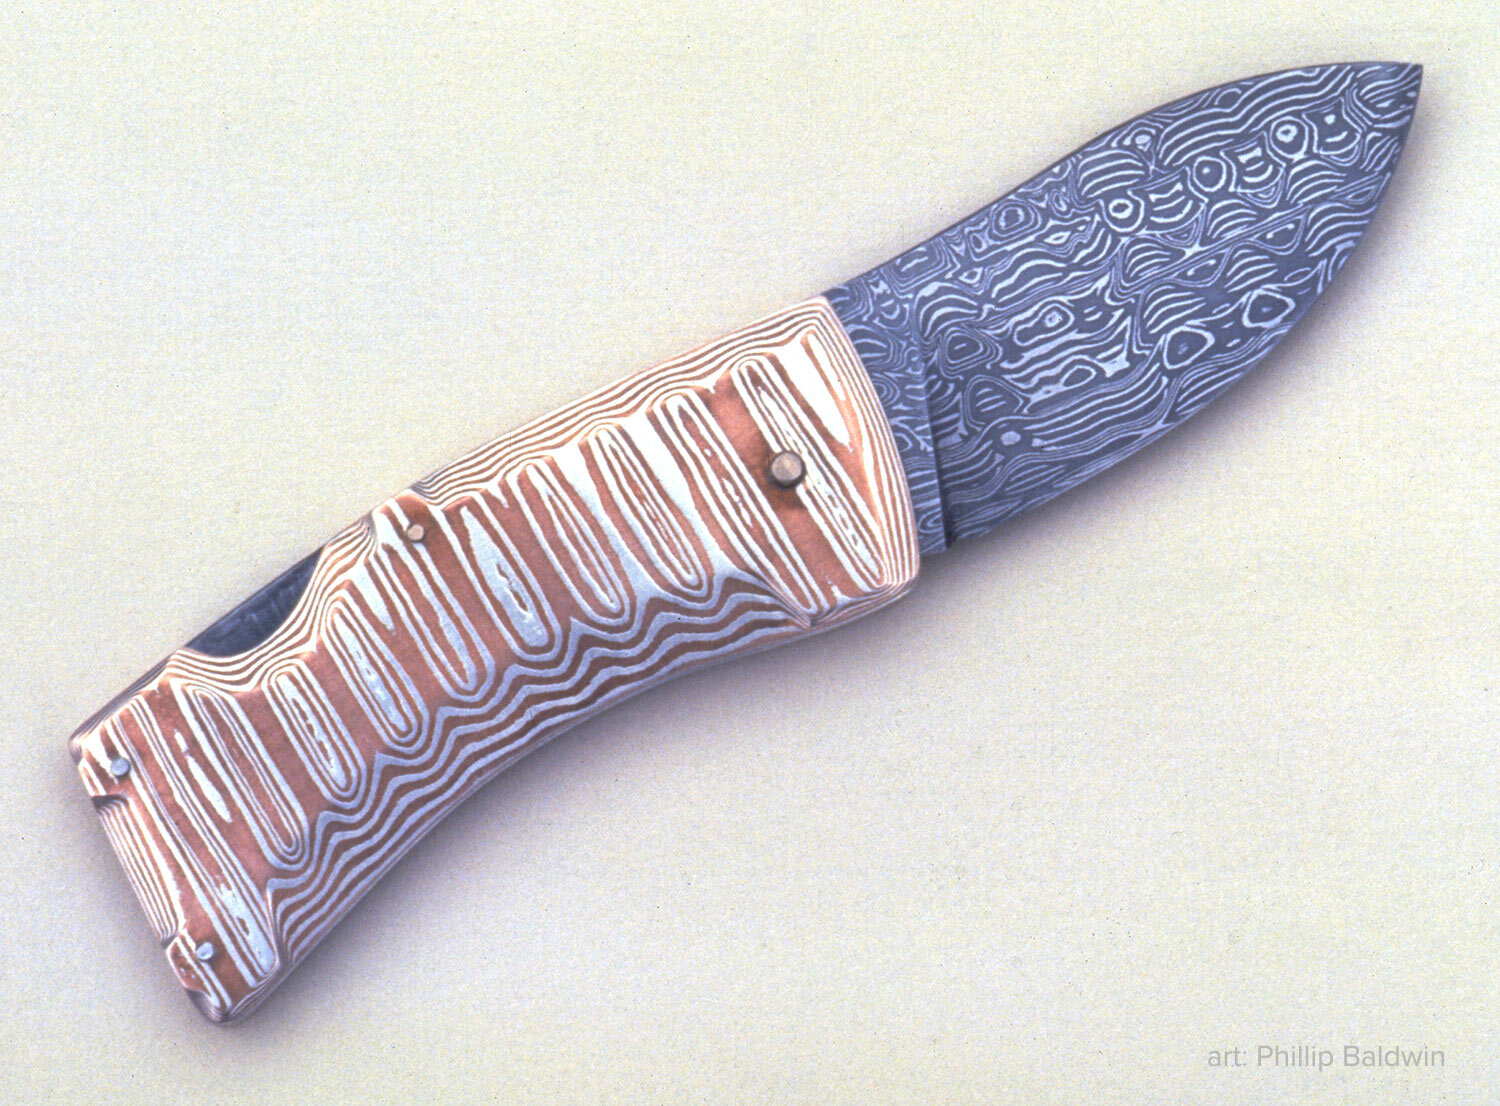
“Mokume Gent’s Folder” by Phillip Baldwin. Pattern-welded steel, sterling silver, and copper.
“New forms of decorative laminated metals are continuously being developed; there is no end in sight, either for the material or its applications. I find this a heartening thought. It means that the world of mokume will always be fresh, new, and fun.”
The Heart and Soul of Mokume Gane
As evidenced by the huge variety of work shown in this book, it is clear that there are an unlimited number of patterns which can be achieved with mokume. With any given sheet you are limited only by the number of layers it contains, their thickness, colors, and your expertise at manipulating it. In this chapter the basic patterning techniques are discussed. Use these as starting points for developing patterns unique to your own work. You can, of course, combine these techniques to fine-tune your control, and to enhance the pattern according to your every whim.
The Punch Method

The first and most basic way to pattern mokume gane is the punch, or repousse, method. By punching up a relief on the surface of the sheet and then filing, or sanding, the surface flat, you will expose a pattern of the internal layers. For this, you will need a pitch bowl and a variety of punches.
Take a flattened piece of mokume sheet stock, (18 or 20 gauge is good), heat it slightly with a torch and press it firmly down into the pitch. A bead or rolled edge of pitch should form all the way around the piece. This bead of pitch will help hold the piece in place while punching. Let it cool completely and select the punches you need. Punches come in all shapes and sizes, but you really only need a few sizes of basic round and line punches. With the few tools in photo on the right, I do 90% of my punch work. I have others, but rarely use them except for detailing.
Using these tools and a chasing hammer, punch down on the back of the sheet, pushing a bump up on the front side that is embedded in the pitch. Quite often you will have to reseat the sheet in the pitch, as the punching tends to make it curl and pull away from the pitch. Carefully lay in a series of punch marks in the desired pattern.
Let’s talk for a bit about certain patterns associated with the shapes of your punches and how the sheet will respond to them. The most basic punch shape is round with a domed surface. Depending on how high or flat the surface of the domed tool is, your sheet will respond differently (see the examples below).
The most important aspect of any of these punches is that they must not have any sharp edges that could cut the metal. Also, it is not wise to punch deeper than half the thickness of the sheet. A simple round punch may be utilized by striking it a single sharp blow in one position, or a series of overlapping blows to create an elongated shape. Remember that the individual layers in a sheet of mokume are only a few thousandths of an inch thick. To develop a consistent pattern, you must use consistent hammer strikes!

You may use a line punch with a single blow, but more likely than not, you will use it to overlap blows as you push it along a line in your design. When doing this, I find it is very important to apply firm, downward pressure on the punch with the hand holding it, so that it does not bounce every time you strike it with the hammer. Angle the top end of the punch slightly away from the direction you are chasing and “plow” a smooth line through the metal. You may adjust the angle of the punch and the intensity of the hammer strike to vary the depth of the indentation. The different widths of the tools and the height of the ridges you raise will expose more or fewer layers in the pattern. Remember that every single bump you make, when filed flat, will expose several layers of metal. What looks like a very simple pattern hammered into the back of your piece, becomes quite complex when the front is filed away to expose the sheet’s many layers. You can repeat certain punch marks to create a regular patterned sheet or combine them for a more organic or flowing look.
After you have finished punching your design on the back of the sheet, heat it to loosen it from the pitch, and wipe it clean. I generally anneal the piece at this time and re-flatten on an anvil using a rubber mallet. If you have any detail or chasing work to do on the front side to refine the design, this is the time to do it. Finally, file or sand the bumps flat on the front side, thereby exposing the mokume’s internal layers. As I said, the possibilities are endless, so take some time to explore this technique and discover them for yourself.

The Gouge Method


This is the method traditionally most favored when patterning large mokume billets. With a sharp steel chisel known as a Hatsuri-Tagane (or bullnose chisel), patterns were cut into the billet several layers deep. The billet was then forged down until its surface was once again completely flat. The entire process could then be repeated, cutting through the original design and creating one of even greater complexity until the desired pattern was achieved.
I use a similar process with fine results, utilizing a flexible shaft tool and carving my mokume billets with burs instead of chisels. I carve the billet after the initial forging or when it is in the thick-sheet stage, and find that, for jewelry applications, working with 3 to 5 mm stock is best. For thicker items, like knife handles or to make larger pieces of sheet for hollowware you may begin with a much thicker billet. If you have access to a milling machine, this is a great tool to quickly and precisely develop a pattern.
Whichever tool you choose to use, cut only a quarter to a third of the way through the sheet, then forge (or hydraulic press) it to flatness instead of rolling. I do not recommend using a rolling mill at this stage, as it will focus stress in the bottoms of the cuts in the billet and cause it to crack there. Also, try not to carve right out to the edge of the sheet if you can help it, and you will have fewer problems with edge cracks. One of the biggest problems with this patterning method is associated with the shape of the channel cut into the metal. I highly recommend cutting channels that are u-shaped as opposed to v-shaped. A v-shaped channel focuses enormous stress at the bottom of the cut that can lead to localized cracking. You can, of course, use a v-shaped tool for initial excavation of the channel, but you should go back before forging and round-out the bottom of the channel with a ball bur or separating disc. The top edges of the cuts also need to be rounded off, as they tend to mushroom when forged and fold over into the area that has been carved out. If this is not done, cold seams will develop that may not show up until the piece is finished.

The proper contour for gouge patterned cuts.
After the pattern has been cut and the top and bottom contours rounded, you may begin forging flat. Forge until you feel the metal lose its softness (your hammer will begin to rebound off the anvil) and then, anneal. After annealing, check for any mushrooming or folding over of the top edges and grind them back if you find any. Continue in this way until the sheet is about 95% flat, then you may make more cuts to add to and enhance the pattern. Again, cut only about a third of the way through the sheet, and proceed as above until your desired pattern is achieved. Once this is done, planish completely flat and to a consistent thickness. When all patterning cuts and forging are done, you may roll to elongate or expand the pattern or to thin the sheet to the thickness you desire. See Project Demonstration 4 (Gouge Patterned Pin) later in the book for more details on this method.

Twist Patterns

Twist patterned wires by Robert Coogan. Copper and silver. Photo: TTU Photo Services.
One of the simplest and yet most attractive patterns is accomplished by twisting. The fired billet is first cut into long rectangles that have a square cross-section. Then the ends and edges are soldered with an even layer of solder. A square-wire-rolling-mill works best for reducing the cross section and lengthening the billet section into a bar, because, all four sides are compressed (and therefore supported) at once. You can use a flat mill or forge by hand, but to assure success, you must only use billets containing very compatible metals and work carefully when forging or rolling the edge grain. Roll to the desired dimensions, (annealing when necessary) all the while watching for any delamination or cracking. Flux and reheat to flood solder into any of these areas as necessary.
Make sure the bar is fully annealed, then place one end in a bench vise and clamp securely. Then clamp the other end with vise-grips. When you clamp the bar, make sure you orient it in such a way that the clamp squeezes the layers more tightly together (clamping it on the edge grain encourages the layers to split apart). Flux the wire heavily with paste flux (you can’t possibly use too much), in case you need to reflow the solder to repair any separations of the layers that occur during twisting. With your torch in one hand, heat the bar to the proper forging temperature for the metals it contains and slowly twist. By careful, localized heating you can control the twisting to achieve the pattern you desire.
Some metals twist better than others, so watch carefully. The areas of highest stress are the corners of the bar. This stress may be reduced by forging or filing to round off these corners. If you observe any cracking or delamination while twisting, stop, file out cracks, then reflow the solder. The whole twisting process is much easier done hot, but the same results may be achieved by cold working with frequent annealing and a lot of elbow grease. Continue to keep a sharp eye out for cracking and delamination.
When you have achieved the desired amount of twist in your bar, file the sharp spiral edges a little and then planish and/or roll square again. Remember, that because the edges were covered with solder before twisting, this solder will have to be filed away to expose the full pattern. Initial forging and rolling of the twisted wire should be done very gently, particularly on edge-grain sections. It may then be rolled with a rolling mill to elongate the pattern in one direction, or in both directions to expand the pattern. The strip is now ready to be used as is, or may be further detailed using the punch method. To learn more about utilizing twisted bars to create interesting patterns, see Project Demonstration 5 (Twist Patterned Bracelet) later in the book.

Rolled and Elongated Patterns

As explained in the last section, you may roll a piece of mokume in a certain direction to accentuate a particular characteristic of the pattern. However, in the case of a pattern developed or enhanced by the punch method, because of the dents in the backside of the sheet, any attempt to roll the piece will distort its shape and pattern and can lead to localized cracking in the thin areas. You must first fill the depressions with solder, file flat, and then roll it. If the back of the sheet is to show in your particular application, sweat solder an appropriate metal to the back prior to rolling to final thickness.
There is another way of patterning that is something of a combination of the gouge and roller elongated method. It is most successful when done with mokume sheet stock with many thin layers. It will yield large, graceful, sweeping lines and is achieved by selectively filing and sanding through some of the layers of the sheet. As you work, you can see the pattern emerge, which gives you quite good control. You create patterns by gently tapering the sheet thickness to get a simple layered or banded look. Do not leave rough file marks on the metal, as this roughness can affect the pattern of the finished sheet.
The important thing with this technique is smoothness. There should be no abrupt changes in metal thickness. When rolling a tapered sheet, insert the thinner end into the mill first, but set the mill to reduce the thickness of the thicker end. Got it? Do not roll it through sideways, as this will curve and/or warp the sheet.
Mokume Veneer
You can elongate or expand a piece of patterned mokume almost indefinitely by using it like a veneer. Sweat solder a heavy sheet of the appropriate metal on the back, being very careful not to trap flux or air pockets between the two pieces. Carefully apply pressure with an old file or tweezers when the solder is molten to force out any extra solder or flux. Do a final clean up of the surface, removing any excess solder on the surface of the metal, then roll to the desired thickness. Since the layers of mokume veneer are so thin, do not attempt to manipulate the pattern further; it is too easy to lose the design altogether. Be very careful not to file, sand, etch, or polish through the veneer when finishing a piece of jewelry.
Double Laminations
This is a time-consuming process, but one that can give very interesting results. The basic process involves using pieces of patterned mokume to laminate back into a new billet. How you orient the patterned pieces in the new billet will determine how the pattern shows up in the double lamination. Care must be taken to use compatible metals with consistent firing temperatures. Since you are laminating sheets or slabs of patterned metal (with two or more metals exposed on its surface), between plain sheets of metal, you will have areas where the metals will be required to bond to adjoining sheets of the same composition.

Double lamination rings by Steve Midgett. Palladium and sterling silver.
Imagine, for instance, you have a sheet of patterned copper and silver mokume, and you wish to laminate this between a sheet of silver and copper. Where the patterned sheet touches the copper sheet, there will be areas where the copper in the mokume is pressed up against the copper of the plain sheet. It will be the same on the silver side; where it presses against the patterned sheet, there will be areas where silver only touches silver. In this example, you then have three distinct metal combinations that all need to be bonded at the same time: copper to copper, copper to silver and silver to silver. These combinations all have different firing characteristics and temperatures.
So how do you do it? There are a couple of ways. If you are forge-firing or firing in the mini-kiln (both eutectic bonding techniques) you need to introduce the third metal into the weld zone. In our example, it would be necessary to introduce atoms of silver into the weld zone between the copper pieces, and copper in between the areas of silver to silver contact. I find this is best done by electroplating a thin layer of both copper and silver onto the mokume piece(s) in the laminate stack. This assures that the copper/silver eutectic will form, and bond everything together.
If you are using very finely patterned mokume in the billet, and the areas of same metal contact are very small, it is likely that there will be some sideways flow of the eutectic alloy formed in other areas which will bond the whole billet together. However, if large areas of same metal contact are involved, you must not depend on this flow to achieve a complete bond. You could probably do it, but the areas where the eutectic is first formed would be overfired.

Detail of “Disc Form IV” by Steve Midgett. 18K, shakudo and 22K. A view of the whole piece is in the Finishing Techniques chapter.
Long-duration solid-state diffusion bonding in a digitally-controlled, electric kiln is very well-suited to this kind of laminating technique. By this method, it would be necessary only to take standard precautions with regard to metal compatibility, controlled firing temperatures, and atmosphere to achieve good bonds between all the metals present.
Carved or Eroded Surfaces
One of the most successful techniques I have used with mokume gane is a carved or eroded surface development. The layers of the mokume sheet are left basically parallel, neither bumped up and filed flat as in the punch method nor cut-out and forged flat as in the gouge method. The mokume is simply carved to expose the different layers in relief, in much the same way that a cameo is carved. This is like the Guri-bori lacquer carving that was first used in mokume tsubas (sword guards).
Augmenting Ancient Technologies with Computer Automation
by Nicole DesChamps
Computer Aided Design (CAD) and Computer Aided Manufacturing (CAM) technologies have migrated into the jewelry industry and art academia with interest and excitement and are emerging as a professional tool for jewelry design and metalwork. CAD software not only aids in the visualization of the designing process, but also defines the geometric data of the object. CAD programs generate information that the CAM machines can understand and translate. In other words, the CAD output becomes the input for the CAM machine. After the mathematical design data are stored in a CAD file, they are transferred to the CAM machine. These CAM machines operate somewhat like printers, importing CAD data to produce a three-dimensional (3D) hard copy rather than a printed one.
The CAM process used to create the work pictured here was a subtractive method. Subtractive methods involve removing material to obtain the desired 3D product and include milling, lathe turning, grinding, and planing. The main advantage of the subtractive process is that the desired object can be obtained by directly machining the stock material, such as aluminum, brass, steel, wood, wax, or in this case mokume gane. All of these methods can be automated and are referred to as Computer Numerically Controlled (CNC). As a result, increasingly complex designs and patterns can be created with CNC technology.
Although mokume gane is an ancient art form, honed by skilled artisans, advancements in computer technology can reveal attributes of mokume gane never realized. I brought these ancient and modern technologies together for the first time to create a pioneering body of work. Intricate designs were created in the virtual environment via CAD software. Without the aid of CAD/CAM technology, the complex and precise shapes designed would be impossible to reproduce with traditional techniques.
Due to its high degree of precision and repeatability, CNC milling is well-suited for carving designs from the fine-layered mokume gane billet that was used in these works. The original mokume gane billet consisted of 27 alternating layers of silver and copper that was forged and rolled to a thickness of 1/8 inch. The CAD designs were transferred to a CNC milling machine, which then determined the milling operation. The CNC milling machine required several hours to create the complex CAD designs.
The machined mokume gane sections were then incorporated into pendants and rings using traditional metalsmithing techniques. As one example, the Inverted Texture Ring demonstrates intricate geometric patterns. Accurate CAD designs were created for back-to-back trapezoidal shapes with identical concave indentations. The precise milling operation of the CNC machine exposed visually continuous, silver/copper elliptical patterns throughout the central zigzag region. In all of displayed works, notice the detail and precision achieved from the combination of these ancient and modern technologies.
Nicole DesChamps is a Lecturer at the University of Michigan School of Art & Design.


NEW LAYERS — WHAT WE’VE LEARNED SINCE
Coming soon: Markus Eckardt will expand upon double-lamination techniques!
FROM THE BOOK’S GALLERY


©2000-2020 STEVEN JACOB INC. All rights reserved. Copyrighted materials – no portion to be reproduced without written permission from STEVEN JACOB INC.