METALS FOR MOKUME
Copper, silver, gold and platinum alloys for Mokume Gane
Barrette by Stephen Walker. Sterling silver, nickel silver, copper, brass, and bronze. Photo: Ralph Gabriner.
“The colors of metals blended and contrasted is very exciting, and the mokume technique is the most genuine way of graphically combining them.”
The mokume artist’s palette of colors
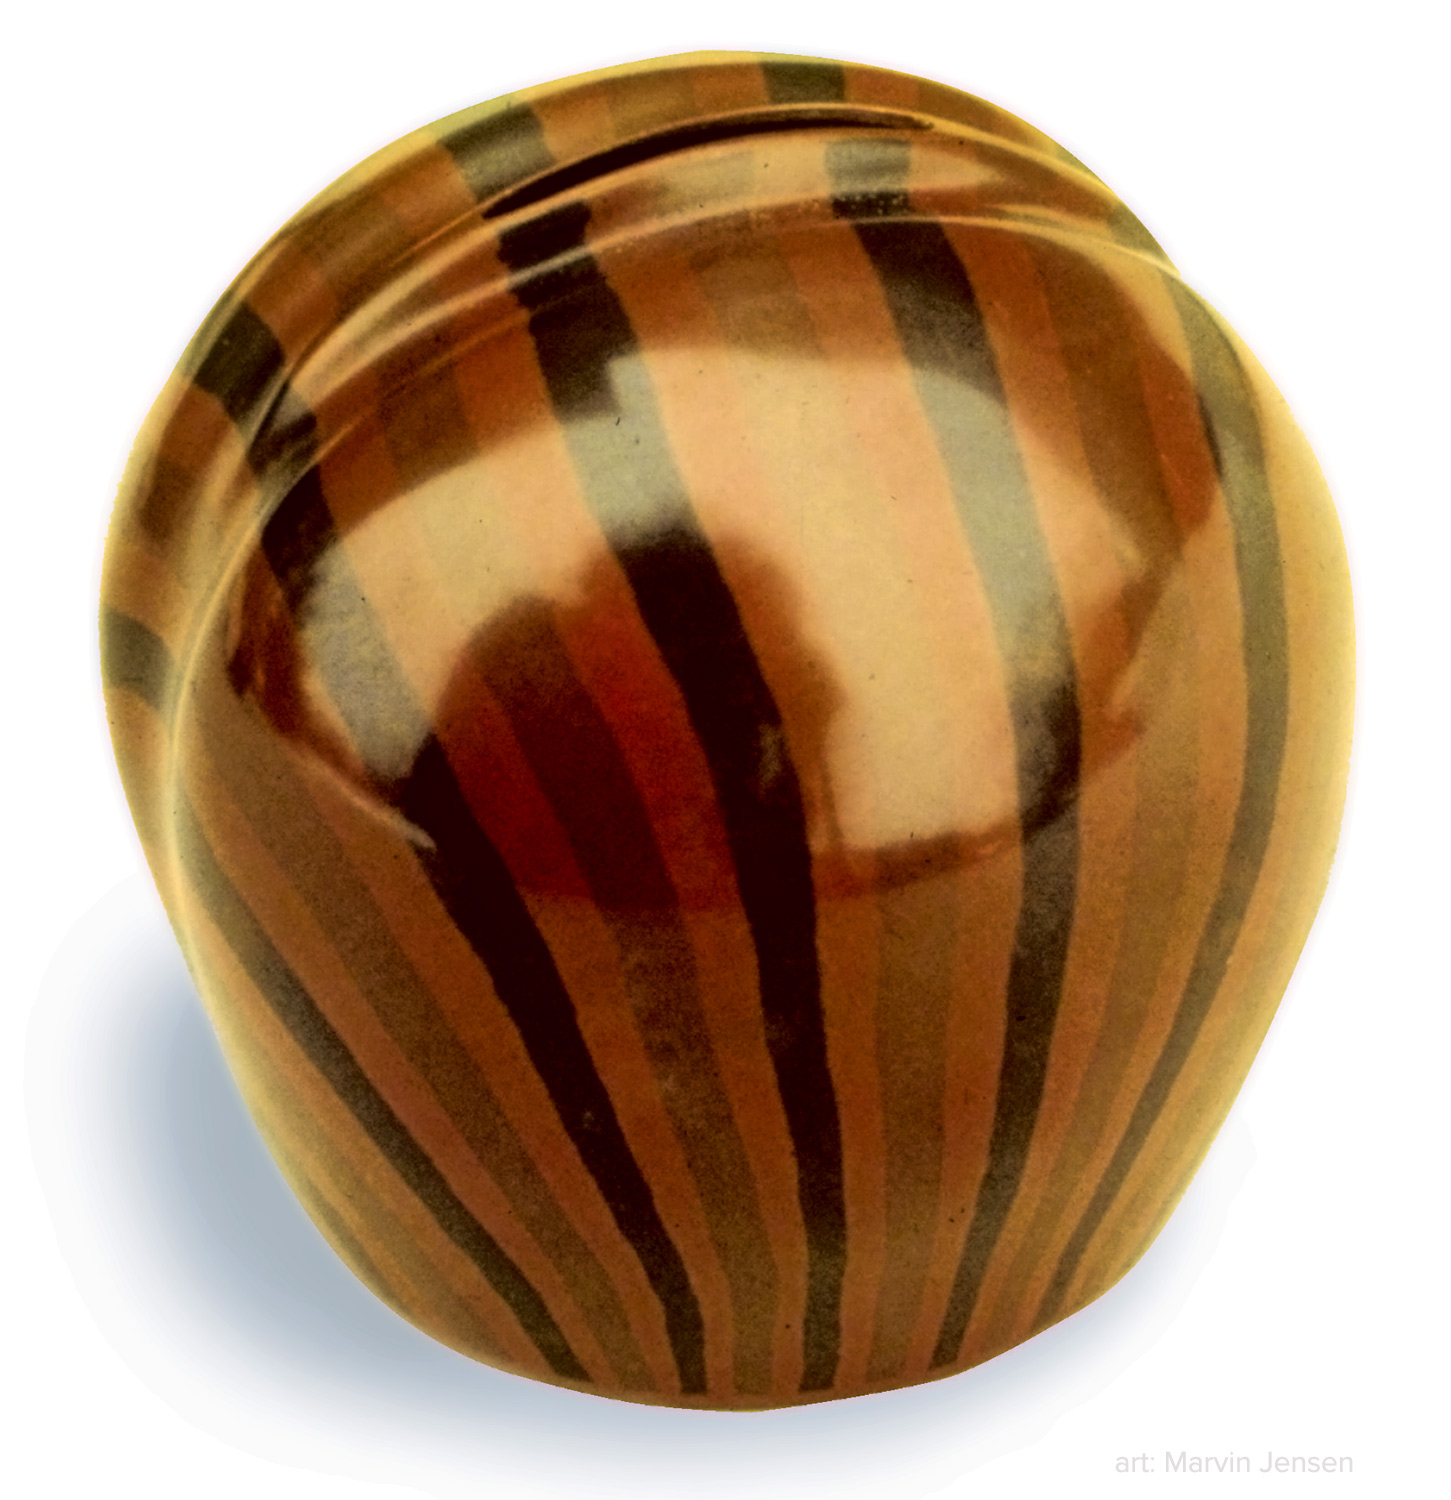
Mokume Vessel by Marvin Jensen. Copper, shibuichi, kuromido, and shakudo.
Let’s begin with a discussion of the metals used for mokume. They are divided, quite naturally, into four main groups: copper and its alloys, silver and its alloys, gold with its associated alloys and the platinum family metals.
Copper is extremely malleable and workable. It alloys readily with many other metals and contributes its good working characteristics and color to the alloy. Aside from gold, it is the only non-white metal. Traditionally, copper and its alloys were the most important metals used in mokume. For jewelry applications, there is a greater emphasis on silver and gold alloys, but copper alloys are very important to knifemakers and metalsmiths who are working on a larger scale.
Pure copper laminates and performs well in mokume. Its pink color naturally patinates to a medium-brown and can add a touch of rich “wood” to your wood-grain metal. It may also be colored with chemical patinas to achieve a wide variety of colors. It is a soft, ductile metal, but can be hardened if necessary.
Shakudo is my favorite traditional copper-based alloy. It naturally patinates from a deep-purplish brown to black and provides the highest contrast of any of the metals mentioned here. It may contain anywhere from two to fifteen percent gold, but I find a four percent gold content to work very well, color nicely, and it is relatively economical to make and use. Shakudo may be hardened by adding three or four percent cobalt, and I use it both hard and soft, depending on the other metals in the laminate.
copper alloys
1. Pure copper
2. Shakudo
3. Brass
4. Nickel silver
Although we don’t usually think of nickel-silver as a copper alloy because of its color (and name), it is predominately copper, and behaves like it in a laminate. It is very gray as “white” metals go, and when it is layered with silver, it looks quite like Damascus steel.
The brass alloys include yellow and red brasses, jewelers bronze, and Nu-gold (rich low brass). Each brass has its own characteristic, and because of the high zinc content of some brasses, care must be taken when combining more than two different copper alloys with silver in the same billet, especially if one is using eutectic or fusion bonding to weld the laminate.
A couple of other traditional Japanese alloys include kuromido, which yields a dark-brown-to-black color after patination. Kuromido contains pure copper with one-percent arsenic. Because of the extreme toxicity of arsenic, making kuromido is very hazardous, and it is therefore not recommended. Kuro shibuichi is actually 84% shakudo and 16% shibuichi, and patinas to a dark gray. Other predominately copper alloys with interesting colors can be made using small quantities of many metals such as cobalt, platinum, palladium, and antimony.
Talisman Brooch by Rosemary Gould. Kuromido, silver, and 14K gold, with psilomalene and amethyst. Photo: Tommy Elder.
Silver Alloys
1. Fine silver
2. Sterling silver
3. Shibuichi
Fine silver is the whitest metal known to man and is extremely ductile and malleable. It is useful in applications where the laminate will be put under a lot of stress during the forming stage and does not oxidize during soldering and annealing, as does sterling. While fine silver is more resistant to tarnishing than sterling, it is still reactive to sulfur and chlorine in the environment. Sterling silver makes a harder laminate and has greater wear-resistance, making it more desirable for rings and bracelets. The color is slightly grayer with a hint of yellow and it will oxidize and tarnish more easily.
Shibuichi is a traditional alloy containing silver and copper. The name means “three-quarters,” containing three-quarters copper and one-quarter silver. It is a natural pale-pink to yellowish-white color and can be used as a silver substitute in mokume. Since it behaves more like silver than copper in a mokume billet, I’ve put it with the silver alloys. Its most common composition is 15-35% silver with the balance being copper but the silver content may go as low as 2% or as high as 60%, as with shiro shibuichi. Shibuichi may be patinaed to achieve a range of gray and brown colors.
Gold Alloys
1. Green golds
2. Yellow golds
3. Red golds
4. Palladium white golds
Bangle Bracelet by Steve Midgett. 18K gold and shakudo.
I think the easiest gold to work with is 18K green. It has a very pleasing color (which I think is a lot less green than American yellow gold is red!) and excellent working characteristics. It is soft enough to work well in a laminate, and yet still hard enough to be durable. Also, because of its lower copper content, it provides greater color contrast to other golds and has a higher melting temperature. I do not recommend 18K green gold containing 75% - 25% gold and silver for high-wear items such as rings or bracelets. For these items, it is much better to use a green alloy containing a small amount of copper. 14K green gold is paler still, and laminates well. However, if it is combined with harder 14k yellow or red golds, its relative softness makes the mokume more difficult to work.
Yellow golds include anything from 14K to 24K fine gold. For most applications, I recommend 18K yellow golds; they bond well and are not too difficult to work in a laminate. Occasionally, I use 22K or fine gold for its rich color, but its softness and expense must be considered. A word about 14K yellow gold: I hesitate to recommend it for a couple of reasons. First, most alloys are quite hard, which makes them less compatible with most of the other metals used in mokume. Secondly, because 14K is a considerably lighter yellow than 18K, I have never found the end result to be very pleasing.
This is particularly evident when it is used together with shakudo or kuromido. In this combination, the dark color of these alloys “pushes” the gold color of 14K, making it appear, by comparison, even paler than it actually is. For the amount of time, effort, and expense that goes into a piece of gold mokume, I have always found it worthwhile to spend a little more money on the alloy that will perform best.
Wedding Bands by Steve Midgett. 18K yellow, white, and red gold. Photo: Ralph Gabriner.
Red gold: the very name brings forth a strong reaction from those who have chosen to do battle with this alloy. I have a love/hate relationship with red golds. I love the color, its fusing characteristics, and etchability, I hate its hardness and affinity to form a large crystal grain structure that can cause it to break-up when working a laminate. There are several things that will improve your chances of creating successful mokume with either 14K or 18K red gold. First, do not use an alloy that contains only gold and copper. Even though this makes the best color, the addition of a little silver acts as a grain refiner, and greatly increases its workability. Second, red golds (as with all copper alloys) should always be quenched when red hot in cold water or pickle. This helps to further reduce the metal’s grain size and subsequent risk of cracking. Third, it is essential to forge red golds heavily before rolling, and then to roll without annealing until a 50% reduction in the thickness of the billet has been achieved. If cracks do appear (usually on the edges of the billet), I prefer to file them out and then forge a little more rather than annealing. Red gold is not for the faint-hearted so wait until you are comfortable laminating the other gold alloys before trying this one.
The only white gold I’ve ever had any success with is 14K and 18K palladium white. It is grayer than regular nickel white golds and more expensive, but its working characteristics are very good compared to nickel white gold and it is well worth the extra money. The palladium in the alloy produces the darkest “white” metal that I have found for mokume, and makes it possible to use this metal in contrast with silver for a beautiful, white-on-white look.
“Shield Series” Pin/Pendant by Steve Midgett. Platinum, shakudo, palladium and silver with diamonds.
Platinum family alloys
1. Platinum
2. Palladium
Platinum and its various alloys are extremely difficult to work with in a mokume laminate. Since it has such a high melting and annealing temperature, and other unique metallurgical qualities, the whole process from fusing to finishing is fraught with problems. If after achieving success with the other alloys listed above, you are willing to risk throwing away your hard-earned money on experimenting with platinum laminates, here are some tips that will enhance your chances of success. Remember that mastering a technique like mokume requires an investment of both time and money. No where else will that be so evident as in using platinum. My specific recommendations for working with platinum are as follows:
1. Be sure to anneal the platinum fully before laminating.
2. I recommend long-duration firings (by whatever method) at as high a temperature as the alloys being used can tolerate.
3. Be sure to use a gold alloy with a high melting temperature so you will be able to anneal or at least stress-relieve the platinum as you work it.
4. All forging and manipulating of the billet should be done cold and the billet should be allowed to air-cool after annealing.
5. Pure platinum is easiest to work with, but is very soft and may not be suitable for many applications.
6. Don’t forget to pray between curses!
Palladium is much easier to work with than platinum. Pure palladium is the easiest, but like pure platinum, it is very soft. Jewelers palladium, alloyed with 5% ruthenium, also works well. It is quite hard, but if well-bonded and handled gently is very suitable for mokume. As with platinum be sure to fire to the maximum solidus temperature of the companion metal. Forge and manipulate cold.
Most of the jewelry alloys available today, combined in a mokume laminate, will have a potential eutectic point that can be readily observed during the fusing process. However, because of the large number different metals all present in the weld zone during firing, it is difficult to determine the proper firing temperature based on the individual metal’s melting temperatures, or phase diagrams. When using unfamiliar alloys or combinations, make small test pieces to determine the appropriate firing temperature and duration before firing a large billet. As mentioned before, some metals, such as platinum with gold, do not form a eutectic alloy in a mokume billet. Depending on which firing technique you are using, it may be necessary to bring the temperature of the lower-temperature melting alloy up to the partially liquid phase for that particular metal. It must not be allowed to reach the liquid phase, which may only be a few degrees higher, or considerable loss of metal will occur. This is what is known as a meltdown, and it will hasten the equivalent psychological experience within yourself.
A final word about metals in general: it is essential that only top-quality metals be included in your mokume laminate. You shouldn’t cut corners here. I make only my own special alloys that are not commercially available, and buy everything else from a good refiner. If you do not feel you are able to alloy your own metals and produce a quality sheet, by all means, use what is on the commercial market. And don’t make the mistake of trying to use casting alloys to make sheet for laminating. Every alloy is designed for a certain purpose. Do your homework and make sure the alloys you’re using have the proper characteristics.
Metals for Mokume
Gold alloys: 14k, 18k, 22k, 24k.
White metal alloys: Palladium, Platinum, Silver.
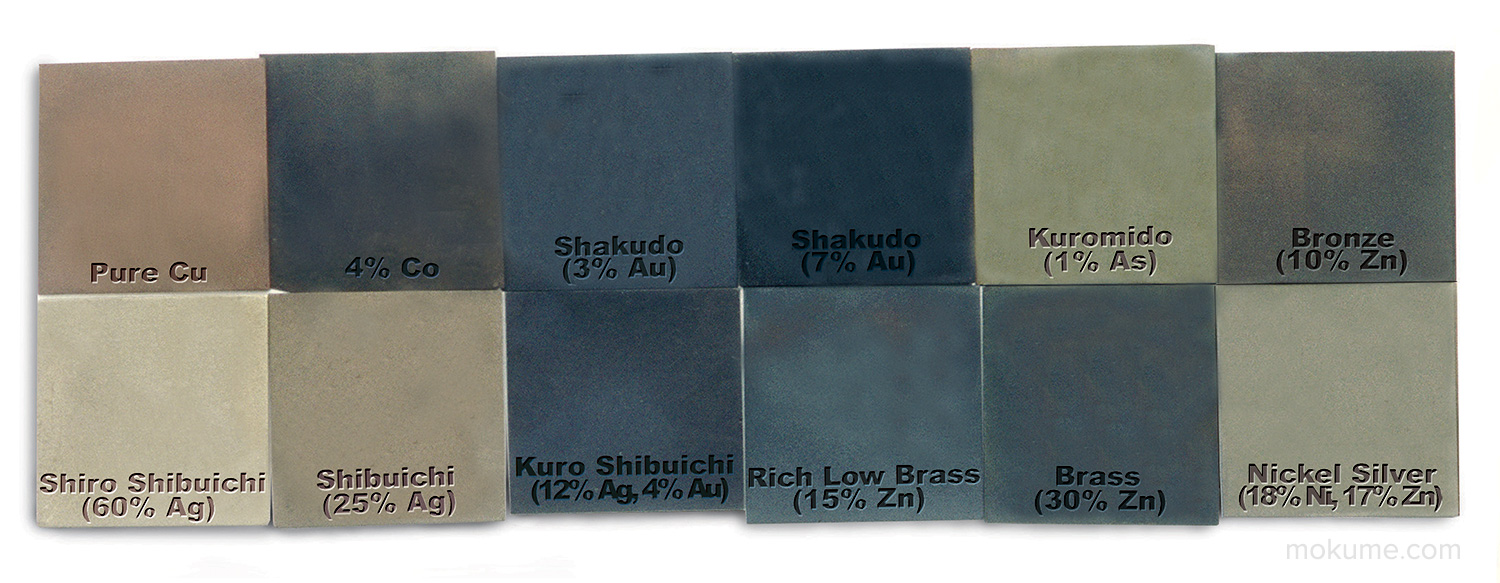
Copper alloys: Copper; Copper (w/Cobalt); Shakudo (w/gold); Kuromido (w/Arsenic); Bronze and Brass (w/Zinc); Shiro Shibuichi, Shibuichi and Kuro Shibuichi (w/Silver); Nickel Silver (w/Nickel and Zinc).
Metals provided courtesy of Hoover and Strong Inc, David H. Fell and Co., and Earthshine Design Inc.
Copper alloys above colored in a warm solution of ammonia and salt for 15 minutes.
Alloying Your Own Metal
Sometimes, it is necessary to make a special alloy (for use in a laminate) that is not available commercially. As I said before, I think it’s much better to buy prepared metal stock whenever you can, but knowing how to make quality sheetstock greatly increases your options for mokume. Listed below is the equipment you will need to alloy your own metal.
Alloying Equipment
1. Melting torch.
2. Scales for weighing the metals.
3. Crucible for metal melting.
4. Ingot mold.
5. Graphite stirring rod.
I prefer an oxygen/propane or oxygen/natural gas mix for my studio torches. It burns much cleaner than oxygen/acetylene, which also has a brighter flame. The bright flame not only hinders judging temperature when soldering and melting, but also makes it extremely difficult to judge the kiln temperature by color when fusing in the mini kiln discussed in Chapter VII.
If you have an electro-melt furnace, it’s even easier. For metal melting, this takes the place of a torch as well as a crucible. It makes the whole job a lot more manageable and precise, but it isn’t absolutely necessary. You will also be somewhat limited in the kinds of alloys you can melt in a hand-held furnace, as the maximum temperature is around 2000 degrees Fahrenheit. A regular ceramic crucible, or even the crucible from your casting machine rigged with a handle will work for torch melting metal.
Scales should be as accurate as you can afford, to 1/10 of a gram or better.
I like an ingot mold that’s adjustable and use metal shims to widen the mold to the point where the ingot is approximately 30% more than the maximum thickness of my rolling mill. This allows me to reduce the metal thickness by thorough forging before rolling, which contributes to a better grain structure. If you don’t have an ingot mold, you may want to try pouring an ingot in water, as demonstrated at the end of this chapter, but the minimal expense of this tool makes it worth buying for almost any shop.
To make a certain alloy, begin by thoroughly cleaning the metals you will be alloying by wire brushing and pickling. You may heat the metal and pickle it while hot to hasten cleaning, but be sure the oxidation that forms from heating is completely removed. Use a ScotchBrite pad with a little soap and water to clean the metal, then dry it, and weigh out the proper quantities. In preparation for pouring, it is first necessary to ready the ingot mold. Wire-brush the inside surfaces of the mold and then lightly blacken them with soot from a gas-only torch or a candle flame. This helps to reduce the available oxygen in the mold when the metal is poured, and also acts as a mold release.
Assemble the mold. Plan to start with as thick of an ingot as you can. In this way you will be able to reform the grain structure through forging and rolling to a greater degree. I plan the volume of my ingot so that the mold will completely fill and slightly overflow into the well created by the bevel at the top opening. This thicker part of the ingot acts just like the button on a casting tree, essentially removing any shrinkage or porosity from the ingot itself. After the pour, it is sawn off and saved to re-melt with the next ingot. Finally, check to make sure there are no gaps at the bottom of the mold through which molten metal may escape, then place the mold in your burnout kiln (or oven) at about 200º F. You will need to experiment with the proper mold temperature for the metal you are pouring. The mold should be as cool as possible while still allowing the metal to completely fill the cavity with no cold seams. Do not preheat your ingot mold with a torch. Torch heating steel causes condensation to form in the mold and if molten metal is poured in on top of this, the force of the steam created will eject molten metal back out of the mold. This could easily injure you and will be a great embarrassment if done in front of co-workers.
If you are torch-melting, make sure you have a cleaned and fluxed crucible. Preheat the crucible, then put in the metal that will constitute the largest portion of the new alloy and heat with a reducing flame (for gold, silver, or copper alloys). Wait until molten or nearly so before introducing the next metal to the mix, then continue to heat. When the metal is liquid, throw in some flux and a little charcoal. This will help absorb any free oxygen around the molten metal.
When the metal reaches a very fluid state and you’re convinced that all the ingredients are thoroughly mixed, it is time to pour. Stir quickly but thoroughly with a graphite rod and skim off any excess flux or charcoal without removing the flame from the metal. Position (or have your helper position) the ingot mold to receive the metal. Make sure it is resting on something fireproof to keep any spills from rolling off and ruining your new shoes. I have had more than one unpleasant experience with this over the years, including a Nike Air blowout, so be careful!
Throw in a pinch more flux, and then pour smoothly, gently and quickly, being careful not to splash the metal. Note: Many ingot molds have very narrow openings that are hard to hit directly with a crucible full of molten metal. To avoid spillage, I carve a funnel out of a small charcoal block. Wire or clamp it to the top of the ingot mold and pour into it. Remove the ingot as soon as possible and examine it for imperfections such as voids, sunken areas, pits, porosity or cold seams. If you find anything but a dense, smooth-looking ingot, recast it then and there, while things are still hot.
If you are using an electro-melt furnace, the procedure is basically the same, with the exception that the charcoal funnel I’ve recommended is even more important. Due to the bulkiness of the furnace, it is much harder to zero in on the opening of the mold. The funnel keeps the molten metal where you want it.
The discovery of the next step in this process was one that immeasurably improved the quality of my sheet metal and the ease with which I could produce it. After removing the thicker “button” section of the ingot, forge the ingot on both sides. This is more than planishing; you actually need to compress the metal down into itself. This encourages the break-up of the large crystal-grain structure of the metal formed during cooling from the liquid phase, and makes for a tougher, easier-to-roll sheet. Reduce the thickness of high-copper-content-alloy ingots by 40% before annealing and beginning to roll. Reduce others by at least 25%. After forging, planish lightly to level the surface. Note: Gold and copper alloys may be forged at red but not orange heat. Silver and platinum alloys should be allowed to cool to black heat or completely before forging. Hot-forging goes a little faster, but it is more dangerous. Unless you particularly enjoy the random pattern of burn marks from the inevitably dropped billets on your studio floor, you should forge cold.
The final procedure I like to perform on an ingot is called “scalping.” This, as the name implies, is removing the outer skin of the ingot and, with it, any surface impurities or slight irregularities. Prior to scalping, roll the ingot just enough to level the uneven surfaces caused by forging; this will reduce waste. I use a water-cooled lapidary sanding belt for scalping, but anything from hand files to a milling machine will do the job. Scalping is not absolutely necessary, unless, of course, you want the absolutely best sheet metal possible.
After the ingot is scalped, it’s ready to roll. Begin rolling, and decrease the thickness of the sheet in gradual, steady increments. The initial reduction is critical to the formation of a good, internal grain structure in the sheet. For basic copper alloys, roll without annealing to at least half its original thickness. Do not allow the sheet to curl. This can often be prevented by turning the sheet over every time you roll it through the mill. If it still curls, flatten it immediately by carefully hammering with a rawhide mallet or by turning it approximately 30 degrees and rolling it through the mill. The next pass, it is turned 30 degrees in the opposite direction. Whenever possible, I prefer to roll the metal through the mill in one direction only until it has been annealed. Then you may change the direction of the roll.
Sometimes, edge cracks or zigzag cracks on the surface develop during this initial stage. These should be cut, filed, or ground away rather than annealing the ingot, and generally indicate a poorer quality ingot, or one that has not been forged enough. If they continue to show up, melt the ingot down and recast it. Once you have reached a 50% reduction, you can anneal and continue to roll to the finished thickness. I find it’s a good idea to reduce the ingot to a sheet that is at most, one-quarter of its original thickness. Any flaws or problems it might have will have shown up by then, and you are assured of sheet material with good internal structure and integrity.
If you have troubles alloying and producing good-quality sheet material, here are some things you can try:
1. Forge more, up to 40% the billet thickness, then roll before annealing.
2. Try a lower temperature for the ingot mold, which should be as cool as possible, while still allowing the mold to completely fill with no cold seams.
3. Most copper alloys can be rolled hot, although I do not recommend it for alloys with a high silver or gold content. Also, given the inherent dangers associated with hot rolling, extreme care must be taken to assure your own safety. If you do decide to try hot rolling, get a helper to assist you.
A final word on alloying your own sheet metal: for alloys containing copper, I always use copper pipe as my source of raw metal as opposed to copper sheet metal. The reason for this is that most copper sheet is alloy #110 Electrolytic Tough Pitch (ETP) copper, which is fine for laminating, whereas copper plumbing pipe is usually alloy #122, a special deoxidized copper. This is superior when making other alloys.
Pouring an Ingot in Water
Japanese craftsmen have developed a unique method of pouring ingots of traditional alloys in water. The method is known to produce a very clean ingot with a fine grain structure. The photos here, by Wayne Meeten, show Hirotoshi Itoh and Asato Tanaka pouring an ingot of shakudo.
Photo 1:
The metal will be poured into a cotton “ingot mold” formed by suspending a layer of pure cotton cloth over a cylindrical frame.
Photo 2:
This mold is placed in a large bowl of scalding water about 5 inches deep.
Photo 3:
The metal is melted with a reducing flame using a gas-fired forge which is bricked in around the melting crucible.
Photo 4:
Generous amounts of copper flux are used. When the alloy reaches pouring temperature, it is poured through the water, down into the cotton mold where it forms into a rounded ingot.
Photo 5:
The metal, though still molten, does not burn the cloth because a jacket of steam forms around the metal. After pouring, the water is stirred around the molten metal to hasten quenching.
Once cooled, the ingot is forged square and rolled into sheet.
New Layers — What We’ve Learned Since
Wow, so much to say and update about this chapter. To begin with, since writing this I have discovered the value of 14K gold alloys, particularly 14K red gold. It is not necessarily the easiest metal to work with, but the color is outstanding. As with 18K red gold, I recommend quenching (or cooling rapidly by a cool air blast) to prevent large grain growth that can lead to cracking when rolling or forging.
Stay tuned for a more in depth update on new alloys for mokume that are now available!
From the Book’s Gallery
©2000-2019 STEVEN JACOB INC. All rights reserved. Copyrighted materials – no portion to be reproduced without written permission from STEVEN JACOB INC.


